Thursday, August 17, 2017

Eclipse prep 2017

With only 4 days to go I'm going to get into the details of preparation for photographing and enjoying (hopefully not mutually exclusive activities...)

This will include calculating ( or looking up) precise observation times, definitions, experimenting with several cameras and lots of wine.

Stay tuned... this is a developing story.

Here's an app that came highly recommended. $1.99+tx.
SolarEclipseTimer app <<<

With just a couple minutes practice I had it find my location and calculate a few event times.

Definitions HERE <<<

1st Contact: Don't look yet!

first contact — during a solar eclipse, the moment that the Moon makes contact with the Sun; the beginning of the eclipse.

Here at 908 Valley Drive that will be 11:52:39  (AM)

second contact — during a total solar eclipse, the moment the Moon covers 100 percent of the Sun’s disk; the instant totality begins.

Here at 908 Valley Drive that will be 13:20:21  = 1:20:21 PM  Start looking

third contact — during a total solar eclipse, the instant totality ends.

 Here at 908 Valley Drive that will be 13:22:52 = 1:22:52 PM

fourth contact — during a solar eclipse, the moment that the disk of the Moon breaks contact with the Sun; the end of the eclipse.

Here at 908 Valley Drive that will be 14:47:37 = 2:47:37 PM

That means the event actually lasts 2 hours 54 minutes and 58 seconds?  Will confirm.

Continuing:   It is now 11:54 on Thursday.   I went out to check the sun position.  OK... Interesting observation. Good time to realize how tall our trees are and just where we can be standing at 11:52 when the "First Contact: happens. We are in good shape. Pics to follow.


 This video was today about noon.  This confirms one thought... the sun (at least with some cloud-cover) isn't going to destroy a go-pro.

Here's a panorama showing the open sky area from back by the garden.

Continuing with my search for information on shooting the moon (as it were...)  this turned up from Nikon:  http://www.nikonusa.com/en/learn-and-explore/a/tips-and-techniques/how-to-photograph-a-solar-eclipse.html

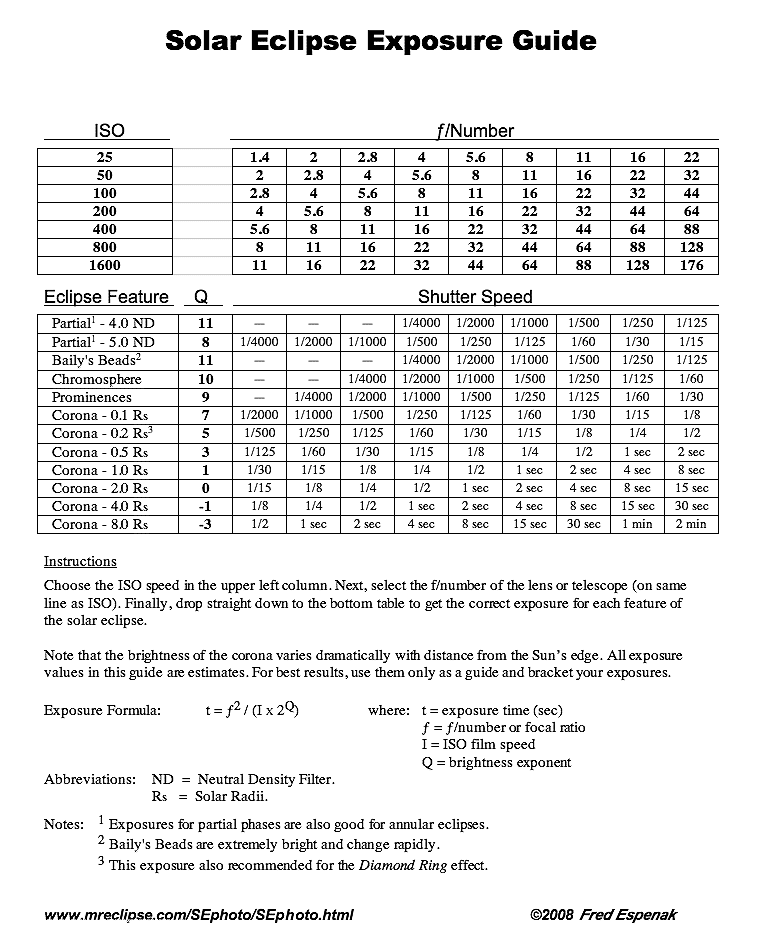
Here is an exposure guide which is referred to by the above article.

http://www.mreclipse.com/SEphoto/image/SE-Exposure1w.GIF 

Exposute intervals?   Here are some calcs:


hrminsec
25458
720032405810498"/3=3499.333333
10498seconds15second interval =699.8666667frames
10498seconds10second interval =1049.8frames


My camera, when tethered to the computer, can be set to take time lapse pics.  When bracketing each frame is the next setting in the bracketing process.  ie:  Frame 1 is under exposed, frame 2 is correct exposure, frame 3 is over exposed.  If I use the 10 second interval I will essentially have 349 sets of photos at each exposure setting.

Then I will have second camera (with much shorter focal length lense) to take pics along the way.


Wednesday, August 9, 2017

Mountain House Chicken Fried Rice


 As an ambassador for the Solo Stove products, we have been asked to review a food product created for camping/back-packing and situations where good food is desired without the challenge of refrigeration.

Last night we did dinner in the fire pit here at our house.  The main course was chicken roasted in foil with onions, tomatoes, garlic and basil.  One of my 45 minute favorites.  While the chicken was baking on the charcoal I took a few minutes to fire up my Solo Titan Stove and boil water for the dehydrated side dish.


The ingredient list reads like a gormet meal of its own!  Chicken, long grain rice, scrambled eggs, onions, red peppers and carrots.

It comes in a waterproof pouch (serves 2) which is used as the cooking dish, sort of.

Boil 1 1/2 cups water. Pour the boiling water into the resealable bag. Sip the bag closed.   After 4 minutes open and stir.  Reseal for 8-9 more minutes.


When we opened the chicken from the foil we served the Mountain House Chicken Fried Rice along side and enjoyed a si
mple and delicious dinner!

Created for camping convenience, this meal is too good not to enjoy any time right here at home!

Happy Trails,


Jeff Kurtz
Solo Stove Ambassador

Monday, August 7, 2017

Checking out the Solo Bonfire

We recently bought a new toy for our camping and backyard adventures.  Checkout the Titan stove from Solo Stoves!

I saw this online while shopping for camping equipment this summer.
New gear always interests me and this little stove was an instant favorite.

  The design behind this stove is really ingenious.  A small package that simplifies the campfire experience so much that we have been using it almost every night here at the house instead of firing up the firepit.


The model that I have is the Titan.  The catalog describes this as a 2-person stove, but everything is relative.   Instead of a log fire in our fire-pit we've just been burning twigs and enjoying our evenings on the patio.  It's small enough that we can put it up on a stand or just on the ground.  There's a ring that fits on top to support a pot or pan.  We did burgers in a frying pan and then picked up a grilling basket with a handle for brats, burgers or about anything you would want to grill.

As you can see, the embers burn down to ash and clean-up is simple.

Next week I'm heading to eastern TN for a motorcycle weekend and I'm looking forward to showing this off to friends there.

Amazingly, we have mostly been burning twigs from around the yard.   For cooking I also have dropped in hickory chunks and charcoal.  Those pieces furn slower and longer, which makes cooking simple.  The heat is very concentrated and things cook quickly.

Down the road I'll look into their pots and pans.

They also have two larger models.  Those would likely be best for larger groups of people.'

Will post more info as I experiment with the Titan.

Happy Trails!

Jeff